Showing posts with label bell pepper. Show all posts

11.11.2010

TWO For The Price of ONE!

So I was chatting with a friend the other day about my blog. I told her that I had pictures for 2 meals that I had made months ago and I never got around to uploading and so forth. Well.... turns out I was mistaken. I, in fact, have 4 random meals from the past! These next two recipes are simple and fast (almost no prep!) - GREAT for a weeknight dinner!
First off we have ANOTHER PIZZA! This time it's a pesto pizza. I started out with a whole wheat prebaked crust and spread a layer of store prepared pesto on top.


The toppings for this pizza include fresh tomatoes, artichoke hearts, black olives, green bell pepper, and red onions.


I top my pizza with the veggies, spread some feta cheese on top, pop it in the oven for about 10 - 15 minutes and DING: dinner is served. I usually pair these quick pizzas with a salad. This meal took me a total of 25 minutes from start to finish! Not too shabby!


Next is another trusted recipe from allrecipes.com. Cheese ravioli with tomato and artichoke sauce. (I LOVE ARTICHOKES!) The recipe calls for fresh tomatoes, but to speed things up I used an undrained can of diced tomatoes. To start things out I prep my artichokes and some green onions. I then start to saute all the sauce ingredients which include tomatoes, artichokes, green onions, garlic, salt and pepper. (I added some Italian seasoning to the mix as well.) This is a very simple sauce that was super tasty!
I boil some prepackaged cheese ravioli while the sauce simmers.

Once the ravioli is finished, I drain the water out and mix in half of the tomato and artichoke sauce.


Final steps include plating the pasta, adding some more sauce to the top, and a sprinkle of parmesan cheese! Everyone in the house liked this meal. Matt said I could make it any time I want! I also paired this pasta with a simple salad (my go-to). This meal took me about 25 minutes to complete.


More meals to come! (Maybe.... I start the new term on Tuesday. Hopefully I can find some time for at least one more post this weekend!)

4.27.2010

Your Beef and Broccoli Substitute!

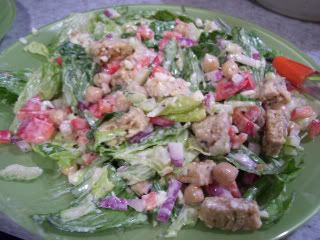
Are you on the Meatless Monday's bandwagon yet? If your answer is no - why the heck not? Not only has my weekly grocery bill gone down since going full-time veg, I no longer suffer from daily heart burn or cramping and gas (yeah - I know you wanted to know that!) Any-who, I have been trying to take it a step further lately and healthi-fy my family's meals, 'cause everyone knows a can of Coke and a Snickers bar is "vegetarian". It also has to do with the fact that I am never home for dinner now - so when I am - I want to try and make it the best meal possible. Being in nursing school kind of makes you want to be a better person as well! I mean sheesh - I am learning about our bodies and how they work, what kind of risk factors different types/sexes/ethnicitys people have - and it makes you want to be a better person! A better person for my patients, for my family, for myself! Just take 2 short minutes to browse through my medical dictionary - the pictures alone will make you want to change your lifestyle to the healthiest possible, in hopes that you won't develop or catch some of the scariest looking medical problems you have ever seen!

So, in my quest to make a healthier dinner, I came across the site eatbetteramerica.com, (suggested by my Aunt Mary Jo actually - she also suggested the avocado soup that turned out yummy). Yeah, sure, it's a General Mills website (so you know there's an agenda), but at least they are trying, right? AND - if you are coupon-wiz, there are tons of coupons to download and print! On this site you will find your regular-run-of-the-mill healthy recipes, and there are also "healthified" recipes, taking old favorites and substituting a few ingredients to make it nutritionally better!

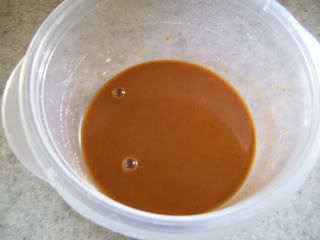
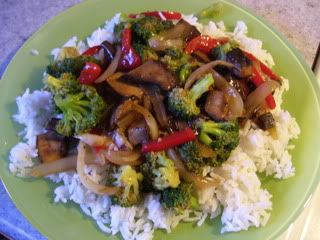
The following recipe is a stir fry - Portobello-Broccoli Stir-Fry that I found in the 30-minutes or less section. And YES! It took less than 30 minutes to prepare (I hate it when it actually takes longer than the stated time because of all the veggie-prep - but this one was true to it's word!) Now that I have eaten it (obviously - lol) it reminded me of a beef and broccoli dish I used to get for Chinese take-out. Reading the reviews on the site confirms this thought as well! Okay - first things first : I make up the sauce so it can meld a bit before I add it to the dish. The sauce was simple, but I did make some changes - I used everything in the recipe - water, soy sauce, hoisin sauce (found in the Asian isle of any well-stocked supermarket, I got mine at Biggs), cornstarch and honey. My family likes rich and bold flavors, so I doubled the hoisin and honey, and added a couple extra shakes of soy sauce as well.


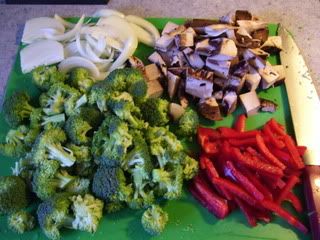
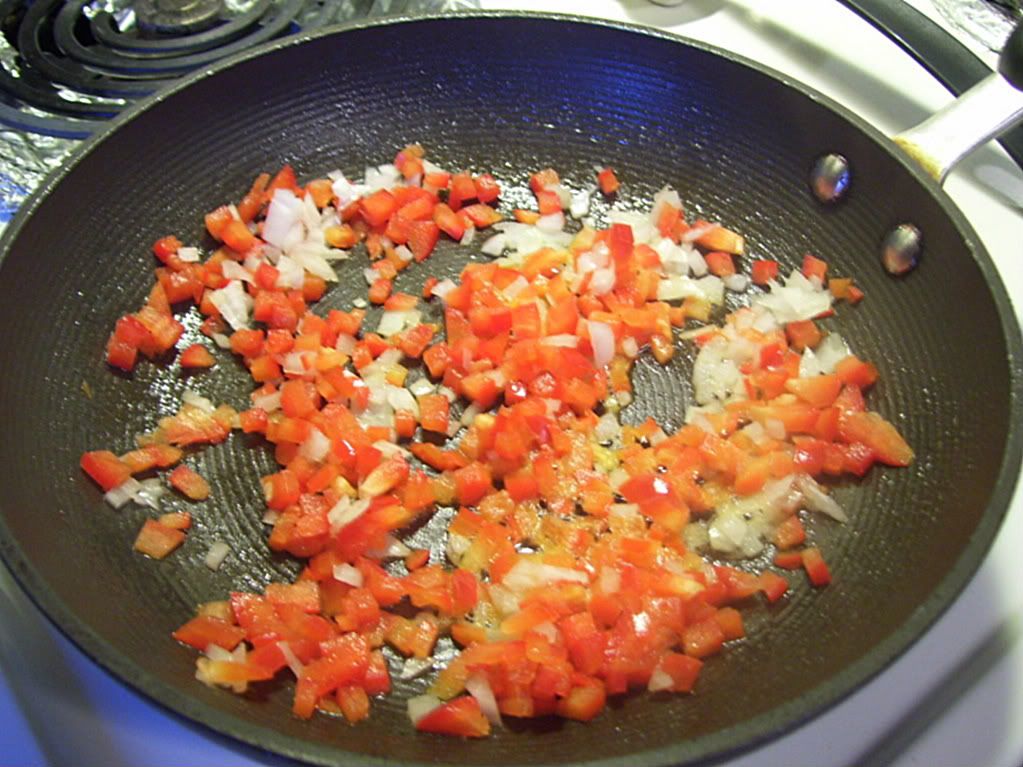
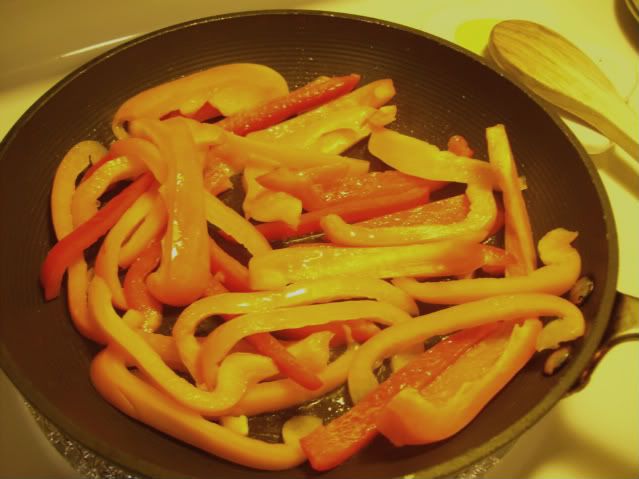
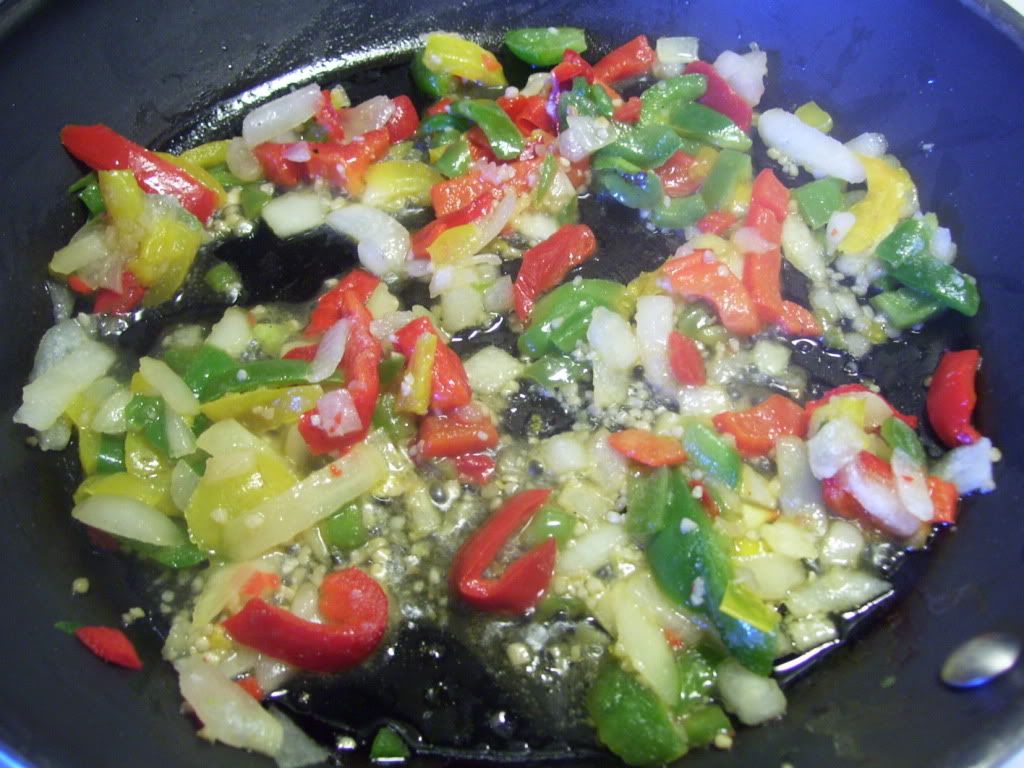
Then it was time to wash and cut the vegetables. Onions, portobello mushrooms, red bell peppers, and broccoli! Really this is a great combo for any stir fry!


I get out my wok and let it pre-heat. I also spray it with some nonstick spray (instead of using oil). This makes the recipe "healthier" as I am not using large amounts of oil to saute the veggies. I start out by sauteing the onions, mushrooms, and red bell pepper first along with some minced garlic.


Once the onions and peppers have started to soften (about 5 minutes) I add the broccoli and about 1/4 cup of water and then I cover the wok with the lid. This is a steaming/stir frying technique that I had never tried before but it worked out really well! I keep the cover on the veggies for about 5 more minutes, or until the broccoli has turned bright green and has softened ever so slightly.
After the veggies have been softened (but not too soft!) I add the hoisin sauce mix. I let this cook for about 2 minutes tops and we are ready to eat!
If you didn't notice, there is not a picture of rice being prepared, that's because I was already-ready this particular day. A lot of times when I make rice, I will make a double batch and put the plain leftovers in the fridge. Rice will keep for a while in your fridge and it's super easy to reheat in the microwave!
The verdict - VERY TASTY! I will say though - next time I am going to add some crushed red pepper flakes to give it a kick!


If you are ready to get on the Meatless Mondays (or Tuesdays, or Thursdays, or whenever) bandwagon, and you want to try something familiar and not too out there, make this stir fry your go-to for the first week! You won't be disappointed!!!

9.28.2009

A Mightier Salad

To finish off the month of September, as promised, I bring you another tempeh recipe. This one was suggested to me by my good friend and fellow vegetarian Beth: Tempeh and Blue Cheese Salad. This being the first time I have ever made it, I stuck with the recipe's specifics. Next time (as there will be a next time because Matt and I thought this salad was fabulous and it was easy to make) I will make a few changes, and these changes have been noted in my post.
To start the recipe out, I cubed half of a tempeh log. An easy enough first step for sure!
This particular tempeh recipe called for steaming the tempeh for 20 minutes. I am not exactly sure what the point of this step was... The finished product didn't taste any different than my normally sauteed tempeh, and had a similar consistency. Next time I will skip the steaming step and just go straight to the skillet!


While the tempeh was steaming, I began to prepare the dressing. Naturally Light Ranch dressing (the absolute best - you don't even know it's light!), milk, garlic, and dried dill is all this takes. Honestly, I don't think it would change the flavor all that much to cut out all but the milk if you are short on time... The garlic and dill adds a nice touch, but aren't necessary!


When the dressing is done, I move onto the salad fixing's. Diced celery, red peppers, red onion, and a half a can of garbanzo beans get mixed in with the dressing. Next time I will cut down on the garbanzo beans. Though they are a great source of protein, the salad already has tempeh (also protein) and it left me rather full! I couldn't even finish it all! So, yeah - next time less garbanzo beans for me!


Once the tempeh is done steaming, I remove it, pat it dry with a paper towel, and then put it into a preheated skillet with a bit of olive oil. Turning the tempeh every-so-often, once it is browned, I remove it and let it cool for a bit before adding it to the salad.


As the tempeh cools, I mix roughly chopped romaine lettuce into the salad mixture. Next time I will use more of the leafy-green-stuff! Not only was I full by the end of the meal, I was left with a pile of salad filling on my plate...


Finally I mix in the tempeh and crumbled blue cheese. It is now ready to be enjoyed!


I like tempeh, I like salad, and I like blue cheese! All three things together make for a really tasty dinner! I hope everyone has enjoyed September's adventure with tempeh! Don't be afraid to try it! Honestly, the easiest way to try it is as a ground beef substitute for taco night! Simply crumble the tempeh, fry as you would ground beef, add your taco seasoning and water - and you are good to go!


I have no idea what is on the agenda for the next post. Unfortunately I don't have any new food photos, so it seems as though I must get on that mission! We'll see what we cook up this week at the Luckey-Meyer pad!

8.25.2009

Eggs and Pancakes in the Late Evening

Remember that last post when I said I always make Steve's Famous Garlic Home Fries when I make breakfast? Well... I... kind of lied. Though that statement really is about 99% true, I amuse myself right now because this next post consists of breakfast... minus the home fries (oops!) Any-hoo, this breakfast was a battle between good and evil. Good because I made a fairly healthy breakfast sandwich and our pancakes had apples in them, bad because we top the pancakes with butter and powdered sugar. Meh - Ronnie would have never ate the sandwich (I can get him to eat over-easy eggs, but he won't eat scrambles or omelets - how weird is that), and he has been begging for Matt to make apple pancakes for weeks now!
Just like the black bean burritos, these apple pancakes are a Matt original. He starts by skinning, coring and slicing 2-3 medium sized apples. He them sprinkles the apples with nutmeg and cinnamon.
Matt then mixes the apples in a pancake mixture. We always just buy the box-stuff that can make pancakes or biscuits. You just throw in some milk and an egg and you are good to go!
All while Matt is working on the pancakes, I am on the other side of the kitchen working on the sandwiches. Cooking Light's Smoked Mozzarella, Spinach and Pepper Omelet Sandwiches to be exact! I start by sauteing finely chopped red bell pepper and onion with just a little bit of olive oil.

After the veggies are tender, I then dump in a mixture of 3 whole eggs, 2 egg whites, about 10 shakes of hot sauce, salt and pepper. This is *supposed* to be an omelet, so taking a spatula to the sides while tilting the pan is the way I prepared the eggs.

I then start to prepare the bread which consists of english muffins and some expensive smoked mozzarella cheese. These will go under the broiler for a few minutes. (Note - after dinner Matt mentioned that he would rather have the muffins toasted so they would be crispy all around. I didn't mind the broiler effect - but everyone's different!) Also I covered my egg pan handle with foil and stuck the eggs under the broiler too - it helped cook the top wet part of the eggs!


Matt on the other side of the kitchen was working my awesome new griddle that Ronnie gave me for my birthday! Griddles are absolutely THE BEST at cooking things like pancakes and over-easy eggs!


Matt has this great talent of frying bread... Grilled cheese sandwiches, pancakes... He always seems to know the perfect time to flip them! That's why he is in charge of this stuff! I always burn them or they are not done enough when I flip foods like this on a pan or griddle.


My omelet and muffins come out of the oven looking lovely! And now it is time to assemble the sandwich!


First layer is the muffin and the now warm and gooey smoked mozzarella cheese!


Next I top the cheese with the omelet. This actually made way more than would fit on the muffin, so we had some extra on the side and it was quite tasty!

To add some greenery I top the omelet with fresh baby spinach. (As I have mentioned before - I LOVE spinach!)

Finally, the top half of the muffin and broiled smoked mozzarella complete the sandwich! This ended up being a pleasant surprise. Matt thinks I should have seasoned the eggs more, but I really enjoyed the simplicity of the eggs. It really lets the smoked mozzarella be the center of attention. I feel like if the eggs had been seasoned more, they would have been competing with the cheese making it a bit too much!


Then there's Ronnie favorite part of the meal! Matt's simple yet delicious apple pancakes! As I said before, no syrup for these bad boys! A little bit of butter and powdered sugar is all these need and they won't last long! Promise!


Next post is a special Cool Kids Grill Out post! My friends and I are having an end-of-the-summer BBQ and I thought it would be fun to ask them about their dishes and take some pictures! I am really excited about it and I hope it goes well. Not all the dishes will be vegetarian (because there are only 2 veggies in my network of close friends, myself included) but most should be veg-head friendly!

8.16.2009

Fancy-Smancy Pizza

At my old place I would have never, ever, EVER displayed on the internet the cabinet I kept all the main cooking ingredients in. It used to be in two cabinets actually, and one of them was called "the cabinet we don't talk about" because when you opened it, usually about 3-6 things would come tumbling out. Now that I have my new space with a bigger kitchen I LOVE my new cabinet! I love it so much, that I wanted to share it with everyone! And seriously, I should have invested in a lazy-susan a LONG time ago! Those things ROCK! So here ya go - this is where it all begins...

Today's post includes a pizza and some fried eggplant. If you know me, you know I LOVE to make pizzas. And not just any 'ole pizza, I love to experiment with new ingredients and toppings almost every time, and this day was no exception - Artichoke-Pepper Pizza with Feta Cheese!
For the fried eggplant, I began by soaking cubed eggplant in some salt water for about 15 minutes.


While the eggplant was soaking, I start sauteing a red and yellow bell pepper I cut into strips with a little bit of olive oil and minced garlic.


For the base of my pizza, in the food processor I add a jar of drained artichoke hearts, 1/4 cup of low-fat mayo, crushed red pepper flakes, freshly ground pepper, and some more minced garlic (because who could ever get enough of that stuff?) I then pulse it all together until it is well mixed.


Once the 15 minutes is up for the soaking eggplant, I drain the water and dry the cubes with a paper towel. After they are nice and dry I toss the eggplant with corn meal and freshly ground pepper.


And into a heated skillet with a little bit of vegetable oil the eggplant goes! This is the first time I have made fried eggplant, and it actually fried up a lot easier than I expected. You just have to toss every few minutes and they are good to go.


I almost always use the Pillsbury ready-made pizza crust for my pizzas. I find that they are equally tasty and easy, and you can almost always find them on sale or a coupon to use. I also always bake the crust for about 6 minutes before I add the toppings and put it back into the oven; it makes for a crispier crust.
So... While the eggplant is frying, I start to top the pizza. First things first, I spread the artichoke mixture on top of the precooked crust.


Next on goes the sauteed peppers and garlic.


And finally I top the pizza with some feta cheese and dried thyme. Into the oven for about 8 minutes it will go!
As I stated before, the eggplant fried up beautifully. I have to admit though - the eggplant was not a big hit... None of us finished it. I think next time I will heat up some tomato sauce to pour on top of it. It was just kind of plain and needed something to go with it.

The pizza out of the oven looks great and ready to eat!


All in all, it was a wonderful meal. The pizza was superb! It could pass for any fancy pizza parlor-pizza! Though the eggplant wasn't as good as I wanted it - I think I could do better with it next time!
Pizza also makes a GREAT leftover for lunch the next day! It was good then too!!!


8.09.2009

Stuff This Not That

Welcome to my NEW kitchen! Okay, well, it's not new-new, but it's new to me!!! Though it's not that much bigger than my old one, I feel like I have so much more room to spread out and really get cooking! You'll also see Ronnie in there - my trusty helper!
Today's meal is consisting of a stuffed shell that I have been making for awhile now. Being a vegetarian, the hardest part about cooking is all the prep-work that can go into it. I like this particular meal because it utilizes frozen vegetables! The only thing I have to prep is some fresh zucchini and opening cans!!!


To start the meal, I boil some lightly salted water and add around 18 shells.


After heating some olive oil in a skillet I add about a cup of frozen pepper and onion mix, along with some minced garlic. See??? No prep! Straight from the freezer to the skillet! LOVE IT!


This is my only major prepping-step! I cut up a medium zucchini. Not too bad at all!


I then add the chopped zucchini to the pepper-onion and garlic mix and let it cook for about 5 minutes. Then I add a small can of sliced black olives! Mm-mmm... Olives! I think it's the olives that really make this meal special.


My trusty helper Ronnie is seen here mixing low-fat ricotta, parmesan and part-skim mozzarella cheese. This recipe originally calls for an egg, but I was out - I honestly didn't even need it as it turned out fine in the end!


After the cheese mixture is together and the vegetables are done cooking, I add all the vegetables with the cheese and then mix in about a 1/4 cup of pasta sauce.


Once everything is good and mixed and the shells have been drained, I then proceed to stuff the shells and add them to a greased 9x13 dish. This really is the hardest step, only because it takes the longest and you have to be a little bit careful to not rip the shells.

Finally I dump a whole bunch of pasta sauce onto the shells. The more sauce the better in my household - especially since leftovers can get really dry if you were light on the sauce originally. I cover the dish with aluminum foil and bake it for about 35 minutes.


After the 35 minutes is up, I take it out of the oven, remove the foil and top with some extra mozzarella. Then it goes back into the oven for another 10 minutes or so.


This meal really does come together easily and it looks way harder than it really is! Two reasons to love it and make it often! Also - though I have never frozen them - they make GREAT leftovers for lunch the next day. ENJOY!